daily meal

Wednesday, February 27, 2013

Pineapple-Filled Biscuits

This week for the Comfort Food Feast on FN Dish we are making biscuits! I love love love homemade biscuits! They are so warm and flaky when they are fresh out of the oven.  Mmmmm there is just nothing like them!


As much as I enjoy eating your standard buttermilk biscuit, I occasionally like to indulge in my grandmother's pineapple filled buttermilk biscuits! Now, I know what you may be thinking.  Pineapple!? Really!? Yes, really! As weird as it may sound, I promise you that these biscuits are a surprising, sweet, delicious, treat! If you are hesitant though, you can still make the biscuits using the recipe below, and just leave them as is, without the pineapple mixture.  However, I highly recommend that you give the pineapple biscuits a try.  They will not disappoint!


Pineapple-Filled Biscuits 
Ingredients

For the Buttermilk Biscuits:
-2 cups flour
-4 teaspoons baking powder
-1/4 teaspoon baking soda
-1 teaspoon salt
-2 tablespoons butter
-4 tablespoons shortening
-1 cup buttermilk

Pineapple Filling:
-1/2 cup cream cheese
-1 cup crushed pineapple
-Pinch of sugar (do this only if the crushed pineapple you are using has no added sugar)

Glaze:
-3/4 cup confectionery sugar
-2 to 2 1/2 tablespoons pineapple juice

Please note: If you are in a rush, although I love the homemade biscuits, you can use the Pillsbury biscuits and then just fill them with the pineapple filling.  If you are only making biscuits without the filling, then I would definitely recommend sticking to making them homemade! They are definitely better than the store-bought kind. 

Directions:
Preheat the oven to 450 degrees F.

In a bowl, mix together all of the dry ingredients.  Add the butter and shortening and mix it lightly until the mixture begins to crumble a little.  Be careful not to mix for too long though because you want the butter to remain cold.

Pour in the buttermilk and mix until just combined.  It is important that you do not over mix.  The dough will be very sticky still, but dump it out onto a floured surface and flour your hands.  Very gently, fold the dough over itself about 5 or 6 times.  Again, it is very important that you do not knead the dough and handle it for too long, because it will change the consistency and end result of the biscuit.

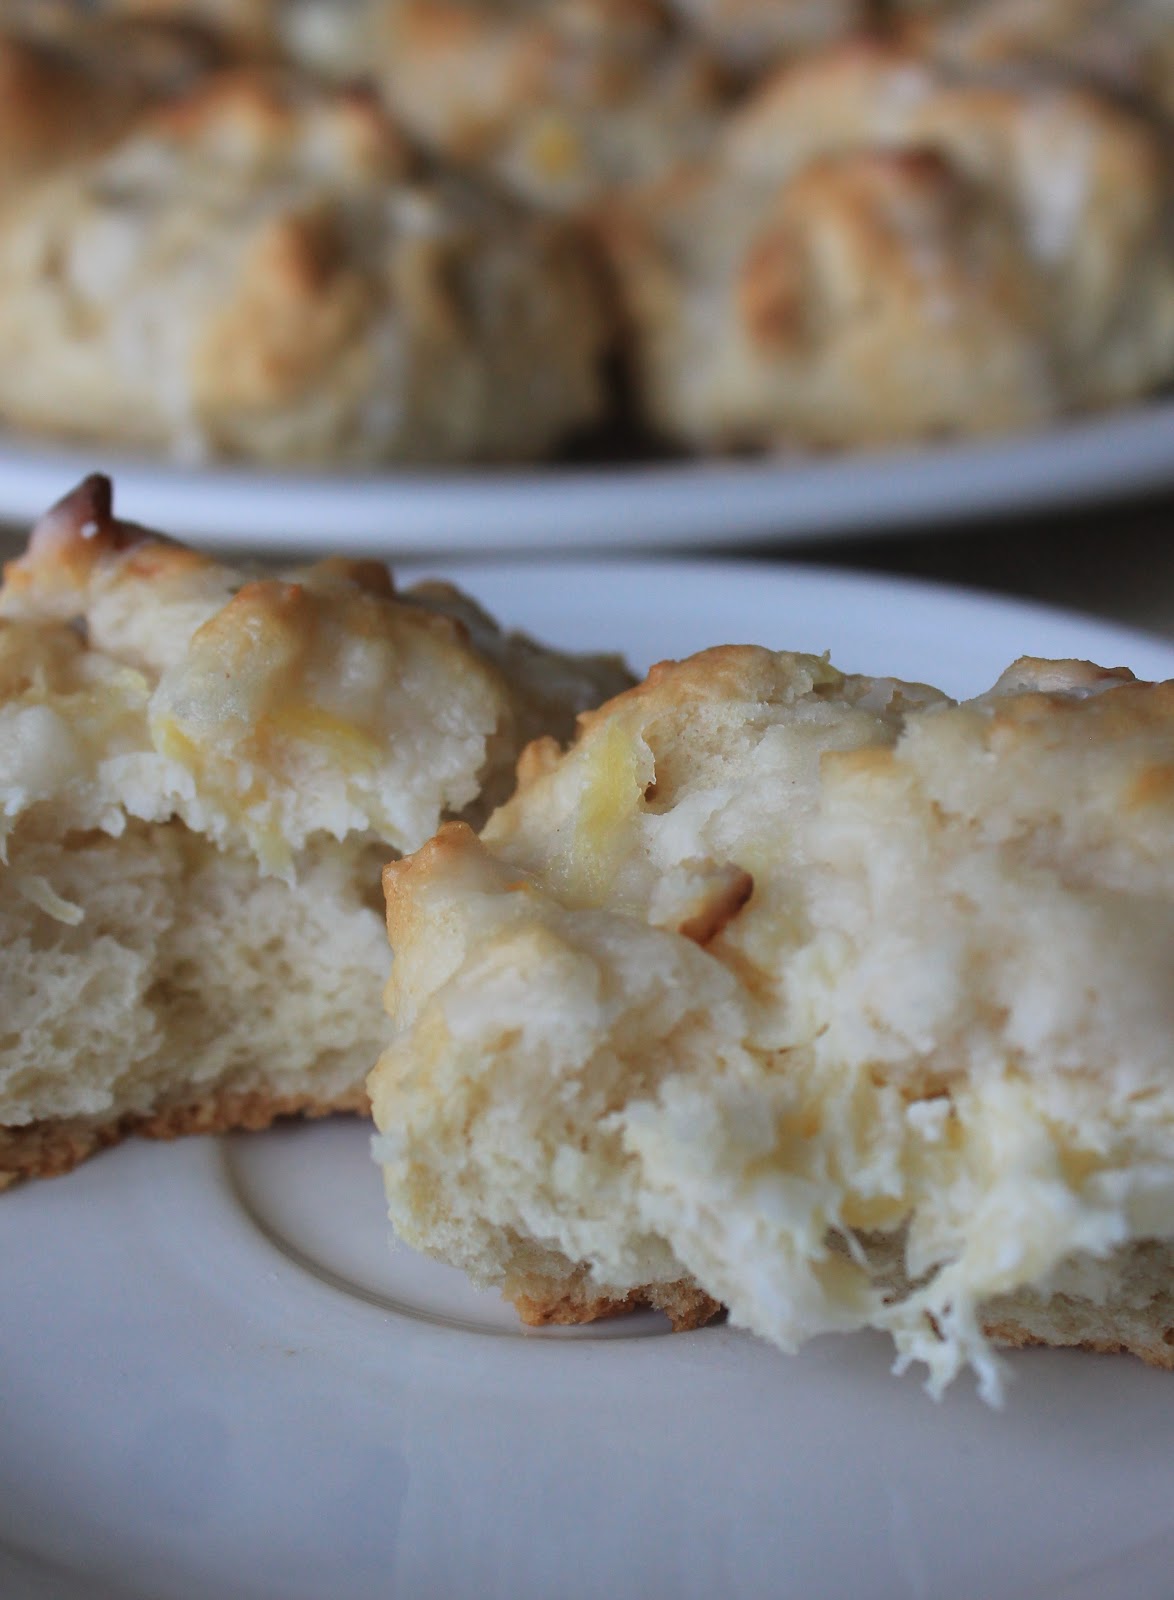
Pat, do not roll, the dough down until it is about a 1/2-1 inch thick.  Cut into rounds and place the dough rounds on a baking sheet.  If you are only making the biscuits, then you can place them in the oven and bake for 10-12 minutes, or until golden brown on top.  If you are adding the pineapple filling, then before you place the biscuits in the oven, mix together the pineapple and cream cheese, and scoop a small amount (barely a spoonful) of the mixture to place in the middle of each biscuit round.  This next step will get messy and the biscuits will look awful, but I promise, this is normal and they will bake just fine.  Using your floured hands, pinch the biscuit dough together over the top of the pineapple mixture (it should look like you formed little bags).

Place the biscuits in the oven and bake for 10-12 minutes or until golden brown on top.  Remove from the oven and let cool for a few minutes.  While they are cooling, mix together the confectionery sugar and pineapple juice for your glaze.  Brush the glaze over the biscuits while they are still warm.

Serve the biscuits warm and enjoy their flaky goodness!


What's Gaby Cooking:Cheddar-Bacon Buttermilk Biscuits
Jeanette's Healthy Living:My Mom's Beijing Biscuits "Shao Bing"
The Cultural Dish:Pineapple Biscuits
And Love It Too:Coconut Flour Country Biscuits
Red or Green?:Green Chile and Olive Oil Biscuits
Napa Farmhouse 1885:Extra-Virgin Olive Oil Drop Biscuits With Cheddar and Garlic
Made By Michelle:Swiss Chard and Feta Fritters
Devour: The Best Mix-Ins for Your Biscuits
Virtually Homemade:Strawberry-Tangerine Shortcakes With Bisquick Drop Biscuits
Daily*Dishin:Quick Cream Biscuits and Slow Bacon Jam
The Heritage Cook:Gluten-Free Buttermilk Biscuits
Thursday Night Dinner:Winter Shortcake Stuffed With Jam and Whipped Cream
FN Dish:15 Takes on Biscuits
Pin It

Daring Bakers' Challenge: Crisp Crackers & Flatbreads

Sarah from All Our Fingers in the Pie was our February 2013 Daring Bakers’ host and she challenges us to use our creativity in making our own Crisp Flatbreads and Crackers!


We had an array of options to choose from, so it was hard to narrow it down, but I ended up maki the Rainbow Crisps, Herbed Faltbread, and Onion and Poppy Seed Crackers.  They were all so delicious! I had never made my own crackers before, but now after seeing how easy it is and how tasty they are, I will definitel be making them myself again!

Rainbow Crisps


Rainbow Crisps

Ingredients:
-2 cups (480 ml) (280 gm) (10 oz) all-purpose (plain) flour
-2 teaspoons (10 ml) (10 gm) (1/3 oz) baking soda

-1/2 teaspoon (2½ ml) (3 gm) salt
-2 cups (480 ml) buttermilk
-1/4 cup (60 ml) (50 gm) (1¾ oz) brown sugar, firmly packed
-1/4 cup (60 ml) honey
-1 cup (240 ml) (180 gm) (6½ oz) raisins, craisins, or any dried fruit of your choosing
-1/2 cup (120 ml) (60 gm) (2 oz) chopped pecans
-1/2 cup (120 ml) (125 gm) (4½ oz) roasted pumpkin seeds (optional)
-1/4 cup (60 ml) (30 gm) (1 oz) sesame seeds
-1/4 cup (60 ml) (30 gm) (1 oz) flax seed, ground (I also used poppy seeds)
-1 tablespoon (15 ml) (2 gm) finely chopped fresh rosemary


Directions:
Preheat the oven to 350 degrees F.

In a large bowl, stir together the flour, baking soda and salt. Add the buttermilk, brown sugar and honey and stir in a few strokes. Add the raisins (or other dried fruit), pecans, pumpkin seeds (if using), sesame seeds, flax seed and rosemary, and stir just until all ingredients are blended.

Pour the batter into two loaf pans that have been sprayed with nonstick spray. I had one large loaf pan and one small loaf pan, so I used those, but if you have two smaller loaf pans, than the batter should split evenly into those.

Bake for about 45 minutes, until golden and springy to the touch. Remove the pans from the oven and allow to cool for a few minutes.  Then, remove the loaves from the pans and finishing cooling on a wire 

rack.


The cooler the bread, the easier it is to slice really thin. You can leave it until the next day or pop it in the freezer, which is what I did so that my slices came out cleaner. Slice the loaves as thin as you can and place the slices in a single layer on an ungreased cookie sheet. Slice so thin that they are almost lacy. Reduce the oven heat to slow 300°F/150°C/gas mark 2 and bake them for about 15 minutes, then 
flip them over and bake for another 10 minutes, until crisp and deep golden. Be careful not to burn.

Herbed Flatbread


Herbed Flatbread

Ingredients:
-1 cup (240 ml) warm water (about 110°F/43°C)
-1 teaspoon (5 ml) (2 ¾ gm) active dry yeast
-3 cups (720 ml) (420 gm) (15 oz) all-purpose (plain) flour, plus more for rolling
-3 tablespoons (45 ml) of extra virgin olive oil
-Coarse salt
-1 teaspoon (5 ml) (5 gm) sugar
-1 large egg whisked with 1 tablespoon (15 ml) water, for egg wash
-Sea salt, for sprinkling
-1/4 cup (60 ml) (7 gm) (¼ oz) fresh rosemary or thyme


Directions:
Place the water in a medium sized bowl and sprinkle in the yeast. Let stand until the yeast is foamy - about 5 minutes. Stir in flour, oil, 2 teaspoons coarse salt, and the sugar. Stir until a dough forms. You'll probably just end up needing to use your hands.

Turn out dough onto a lightly floured surface and knead until smooth, about 2 minutes. Use as much flour as necessary so it is not a sticky dough. Place in a lightly oiled bowl and roll the dough around in the bowl so that it is also lightly oiled on the surface. Cover the bowl with saran wrap or a clean dish towel. Let stand in a warm place until it doubles in volume, about 1 hour.

Preheat oven to moderate 350°F/180°C/gas mark 4. Divide dough into 16 equal portions and cover with plastic wrap.

Roll out each piece to approximately 4"x10" (10cm x 26cm) on a lightly floured surface. Transfer to parchment lined baking sheet. Brush with the egg mixture and sprinkle with sea salt and herbs. Bake, rotating sheet halfway through baking, until crisp and golden, 18-22 minutes. Let cool on the baking sheet then transfer to a wire rack to cool completely.

Onion and Poppy Seed Crackers


 Onion Poppy Seed Crackers 

Ingredients:
-1 medium onion
-1 large egg
-1/3 cup (80 ml) vegetable oil
-2 teaspoons (10ml) (12 gm) salt
-2 cups (480 ml) (280 gm) (10 oz) all-purpose (plain) flour
-1 teaspoon (5 gm) baking powder
-2 tablespoons (30ml) (18 gm) (2/3 oz) poppy seeds
-1 tablespoon (15 gm) (½ oz) granulated sugar
-1/4 teaspoon freshly ground black pepper


Directions:
In the bowl of a food processor fitted with the blade attachment, puree the onion. One medium onion will yield approximately 1 cup puree. Measure 1 cup puree and liquid from the onion and return to the food processor.  Add the egg, oil and salt and blend until well incorporated.

In another bowl, measure the dry ingredients. Mix lightly to combine. Make a well in the center and add the liquids in this well. Mix in one direction until the dough is fully combined. Lightly knead the dough, flouring as needed, for 2 minutes. Wrap tightly in plastic wrap and rest in the refrigerator for 1 hour.

Preheat oven to moderate 350°F/180°C/gas mark 4.

This is a very soft dough and you may find it best to roll it between two sheets of parchment paper.  I just floured my pasta roller and the dough and rolled it through there. Roll as thinly as possible. In fact, it is best if rolled as thinly as a strudel dough. But don't worry if you can't get it that thin. The crackers will still be fine. Cut into desired shapes.

Bake until evenly golden. The time required will depend upon thickness but anywhere from 5 - 15 minutes. If they are thicker, the crackers will puff up like little pitas. Cool thoroughly before storing in air tight container.

I hope you have a chance to try all of these delicious recipes! Enjoy!

Pin It

Thursday, February 21, 2013

Improv Challenge: Peanut Butter Kiss Cookies

Although Valentine's Day has come and gone, who says that you can't still treat your love to some baked goods?! As much as I may love spending time with my hubs on Valentine's Day, I love spending time with him regardless.  That is why, for this month's improv challenge, I was so happy when Kristen from Frugal Antics of a Harried Homemaker had us create any dish that we wanted, so long as it contained hearts and flowers!


In keeping with the season, and because I love baking for my hubby, I decided to make his favorite cookies - peanut butter kiss cookies - only this time around, I cut the cookies into the shape of a heart and used chocolate hearts for the center.

Peanut Butter Kiss Cookies

Ingredients:
-1/2 cup shortening
-1/2 cup peanut butter
-1/2 cup sugar
-1/2 cup brown sugar
-1 egg
-1 teaspoon vanilla
-1 teaspoon baking soda
-1/2 teaspoon salt
-1 3/4 cup flour
-1 bag chocolate kisses with wrappers removed (or hearts)
-Extra sugar for rolling

Directions:
Preheat the oven to 350 degrees F.

Combine the shortening, peanut butter, sugar, and brown sugar in a bowl.  Add the egg and vanilla.  Then, mix in the baking soda, salt, and flour.  Scoop out spoon fulls of dough into your hands and roll into little balls.  If you are making them in the shape of the heart, then you can just take a spoon full of dough and press it down into a heart mold.  The picture below illustrates what these cookies normally look like when not making them into hearts:


Once you have a few balls of dough, roll them around in the extra sugar and place on a baking sheet.  Make sure to leave them in the ball shape (or heart shape) as they will puff out naturally, and when it comes time to place the kisses in, they will spread out to be larger cookies.

Continue rolling your dough into balls and rolling them in sugar.  Once all of your dough mounds are ready to go, place them into the oven and bake for 8 minutes.

After 8 minutes, remove the cookies from the oven and place the kisses or hearts into the center.  The cookies will puff out and crack a little when you do this.  That is normal.  Then, return the cookies to the oven and bake for an additional 2-5 minutes.  I usually only bake them for an additional 2 minutes.

Once done, remove the cookies from the oven and let them cool on a cooling rack.  Although sometimes it is hard not to bite into these cookies right away! Enjoy!


Pin It

Wednesday, February 20, 2013

Classic Meatloaf

This week for Comfort Food Feast on FN Dish, we are making Meatloaf! Meatloaf is one of those dishes that many people grew up with, including my husband.  However, I never actually ate meatloaf growing up.  In fact, the one time that I did try meatloaf, I got sick! After that, I always steered clear of meatloaf.  In retrospect, I think I was actually just getting the stomach bug and that it was not actually the meatloafs' fault, but when you are seven years old, you don't exactly always think clearly!


Since my husband loves meatloaf though, and after years of going back and forth with him on not making meatloaf for dinner, I finally caved and made him one! And as much as I hate to say it, because I am stubborn and like to win with my husband, I actually like the meatloaf! In fact, the dish inspired me to think of ways to keep the classic taste, but play around with the ingredients to find the perfect combination.  Below is what I have come up with thus far!

Classic Meatloaf
Ingredients

For the Meatloaf:
-1 1/2 to 2 pounds ground beef
-1 small onion or half of a larger onion, chopped
-1/2 cup bread crumbs (I used Italian for extra flavor)
-1/4 cup Parmesan cheese
-1/4 cup parsley, chopped
-1/4 cup milk
-1 tablespoon garlic, minced (optional)
-2 eggs, beaten
-Salt and pepper

For the Glaze:
-1/2 cup Ketchup
-2 tablespoons brown sugar
-1 tablespoon mustard
-Dash of Worcestershire sauce

Directions:
Preheat the oven to 350 degrees F.

Place all of the meatloaf ingredients into a bowl, and using your (very clean) hands, combine all of the ingredients.  Then, in a separate bowl, mix together all of the ingredients for the glaze.

Remove the meat mixture from the bowl and form into a loaf on a pan or baking dish.  Spread about 1/3 of the glaze over the loaf.  Place the loaf in the oven and bake for 45 minutes.  Add about another 1/3 of the glaze after the 45 minutes, and then cook for an additional 15 minutes.  Once the loaf is done (internal temp of the meat should be 155 degrees and/or no longer pink), remove from the oven and you can either top with the additional glaze or save it for serving, which is what I like to do.

Slice it up, serve warm with the extra glaze, and enjoy!

Jeanette's Healthy Living: Balsamic-Glazed Roasted Vegetable Meatloaf
The Cultural Dish: Classic Meatloaf
Red or Green?: Meatloaf With Green Chile
Napa Farmhouse 1885: My Mom's Meatloaf (Connie's)
And Love It Too: Not Your Momma's Meatloaf
Made By Michelle: Turkey Meatloaf
The Heritage Cook: Succulent Gluten-Free Meatloaf, The Ultimate Comfort Food
Feed Me Phoebe: Smoky Meatloaf With Three Paprikas
Virtually Homemade: Bacon Wrapped Meatloaf With a Spicy Sweet Ketchup Glaze (Gluten-Free)
Devour: Pick Your Meat (Loaf): Beef, Pork or Turkey
Dishin & Dishes: The Ultimate Southwest Meatloaf
FN Dish: For the Love of Meatloaf Pin It

Wednesday, February 13, 2013

Traditional Beef and Irish Stew

This week for the Comfort Food Feast on FN Dish, we made the comforting dish of beef stew! Beef stew is such a classic and easy dish to make.  Like my Chili, I often make my stew in a slow-cooker when I have time on the weekends.  This can easily be made in a regular saucepan though.


Of course, I could not make just one stew this week.  Since I love the smell of stew simmering in the kitchen, I ended up making two different types of stew - a traditional beef stew and a traditional Irish stew! Although St. Paddy's day is still over a month away, I figured I would start getting ready early!

Beef Stew Recipe 
Ingredients:
-3 to 3 1/2 pounds beef for stew (or chuck meat)
-2 tablespoons olive oil
-1 onion, diced
-1 bag baby potatoes cleaned and cut in half or left whole - it's really what you prefer
-1 1/2 to 2 pounds baby carrots
-About 4 to 5 stalks of celery, sliced
-8oz can of diced tomatoes
-2 beef bouillon cubes
-Salt, pepper, and parsley to taste
*Optional - a little flour (about a tablespoon) and water mixed together to thicken the broth

For the Irish Stew recipe and directions, CLICK HERE.

Directions:
Place all ingredients, except for the potatoes, into a slow-cooker and add just enough water so that all ingredients are covered.  Let cook in the slow-cooker anywhere from 4 to 10 hours, depending on the settings your slow-cooker has.  I add in the potatoes with about 1 hour to go, just because they soften up and cook easily.  I also like to make this a day ahead of time so that the flavors have a chance to meld together and really enhance the dish.

If you are in more of a pinch and do not have time to use a slow-cooker, than here is how to prepare in a regular saucepan:

First, saute the onions and beef with the olive oil, and season with the salt, pepper, and parsley.  Then, add in the celery and carrots.  After a few minutes, add the diced tomatoes, and fill with water and add the bouillon cubes.  Let cook for about 1 to 1 1/2 hours before adding the potatoes.  Cook for an additional 20-30 minutes and thicken with the flour and water if desired.


Then, scoop the stew into a bowl, dig in, and enjoy!


Check out the other participating blogs as well:
The Cultural Dish: Traditional Beef and Irish Stew
Taste With the Eyes: Spinach Mushroom Risotto With Pecans 
Devour: Top 3 Chicken Stews
Cooking With Elise: Chicken and Sausage Gumbo
Virtually Homemade: Winter Vegetable Stew
The Sensitive Epicure: Gluten-Free Shepherd's Pie With Lamb and Rosemary
FN Dish: Stand-Up Stews Pin It

Saturday, February 9, 2013

Basic Pizza Dough

Pizza dough can easily be bought in the store, rolled out, topped with ingredients of your choosing, and then thrown in the oven.  As easy as that may sound, making your own homemade pizza dough is just as simple! Yes, it may take a couple of hours of waiting time, but it takes only minutes to prepare, and the end result cannot be store bought!  Plus, the best part about making your own dough - aside from the fact that it is homemade and delicious - is that it makes enough dough for 2-3 pizzas and can be used to make calzones too! So don't be afraid. Channel your inner Italian and make some dough!

Basic Pizza Dough Recipe

Ingredients (enough for 2 large or 3 medium pizzas, or a pizza and calzone)
-3 1/2 to 4 cups flour (Please Note: I use whole wheat bread flour, but in general, if you use all-purpose flour versus bread flour, just know that the texture and taste will be different.)
-2 tablespoons olive oil
-1 teaspoon sugar
-1 teaspoon salt
-1 packet rapid rise yeast
-1 1/2 cups warm water


Directions:
Start with 3 cups of your flour, and add to a bowl with the salt. Set aside. 

In another small bowl, pour in the olive oil, sugar, and yeast, and then pour in the water. Stir just a couple of times to mix in the sugar and yeast, but then let it stand for about 10 minutes, or until the liquid becomes frothy and foams from the yeast.


Once the liquid foams a little, pour it into the flour and mix. At this point, I usually just take off my rings and dig in with my hands. Slowly add more flour a little at a time if needed. 

(Dough before kneading)

Turn the dough out on a floured surface and continue kneading for about 5-10 minutes, or until the dough because smooth. Lightly grease a bowl and place the dough in the greased bowl. Cover with a dry towel and let sit in a warm, dry, place for an hour. I sometimes put the bowl under the oven light if I am in a rush!


After an hour, the dough should have risen and doubled in size. Turn the dough out on a clean and lightly floured surface. Literally punch down the dough and knead again for a minute. Divide the dough in half (if making 2 pizzas) or in thirds (if making 3 smaller pizzas) and place the dough halves in separate greased bowls. Cover the bowls again with a towel and let rise for about another 45 minutes to an hour. 

Once the dough has risen again, you can plastic wrap it and refrigerate it for later use, or roll it out to use right away. 

If using right away, make sure to preheat your oven to 475 degrees F, and let the pizza stone sit in the oven while it is preheating.  If you do not have a pizza stone, you can also use a regular baking pan.  Top the dough with the ingredients of your choosing and bake in the oven for 10-12 minutes.  Then, enjoy your homemade pizza dough! 

Pin It

Wednesday, February 6, 2013

Chicken Marsala

This week for Comfort Food Feast on FN Dish, myself and fellow bloggers were challenged to make a chicken dish.
 
No matter how I make my chicken, it always brings back childhood memories of when my parents would encourage me to try new foods by telling me that they all taste "just like chicken." The funny thing is, even though I never really believed my parents when they said that to me, I would still eat whatever item they wanted me to after that.  I've also pulled that line out when trying to get my husband or younger brother and sister to try something new.  Go figure! 

This week though, for the Comfort Food Feast, rather then making a dish that tastes "just like chicken," I actually prepared one of my most favorite chicken meals - Chicken Marsala! Chicken Marsala is especially meaningful to me since it brings back even more memories of my grandmothers Italian cooking!

I have a couple of different ways that I make my Marsala - a healthier version and a not as healthy version.  I provided both recipes below so that you can choose your poison! No matter how you make it though, it is so warm and comforting, and of course, tastes delicious!

 Chicken Marsala

Ingredients (healthier version):
-1 1/2 pounds boneless chicken breasts, cut in half
-16 ounces mushrooms, cut and cleaned (cremini, oyster, shiitaki, baby bellas, etc)
-1 onion, sliced
-3 tablespoons butter
-1 tablespoon olive oil
-1 tablespoon garlic, minced
-1 cup Marsala wine
-1 cup chicken stock
-Salt, pepper, and oregano to taste
-Thyme and basil to taste
-Parsley for topping

Please note: Since this version does not require the chicken to be dredged in flour, the Marsala sauce will not be as thick as it normally is.

Directions:
Pour the olive oil and 1 tablespoon of butter in a pan.  Heat the pan until the oil is hot and the butter melts.

Meanwhile, prepare your chicken.  Cut off any excess pieces of fat, and lightly season with salt, pepper, and oregano.  Once seasoned, place the chicken in the pan and cook the chicken for a couple of minutes on each side.  Remove the chicken from the pan and set aside on a plate.  Cover the plate with tin foil or a clean cloth in order to keep the heat in.

Using the same pan that you cooked the chicken in, add 1 more tablespoon of butter, the onions, garlic, mushrooms, thyme and basil (I just give a couple of shakes of the spices).  Cook for about a minute or two.  Then, add the Marsala wine.  Allow the wine to come to a boil, and then let it simmer for about 10 minutes or so, until it reduces in half. 

Once the wine has reduced, add the chicken stock.  Continue cooking for about another 10 minutes.  Then, take your chicken and add it to the pan to allow it to finish cooking (about another 5-7 minutes). 

Remove the pan from the heat and slowly stir in your last tablespoon of butter.


Version 2:
All of the same ingredients from above with the addition of flour.  Before cooking your chicken, pour some flour in a dish, and stir in all of the spices listed above.  You are basically just seasoning the flour. Then, take your chicken pieces and lightly dredge them in the flour before cooking them in the pan.  Follow the rest of the recipe as listed above.


Serve warm with a glass of wine and enjoy!

Pin It

Tuesday, February 5, 2013

Nutella Pots de Creme

Guess what today is? It's World Nutella Day! That's right... there is a whole day dedicated to the delicious, melt-in-your-mouth, chocolaty-hazelnut treat! Thanks to Sara from Ms. Adventures in Italy and Michelle from Bleeding Espresso, World Nutella Day was created in 2007 and has been going strong ever since! I mean, who doesn't love Nutella, right?


The first time that I participated in World Nutella Day, I made Mascarpone Cheesecake with a Nutella Glaze.  This year, in honor of one of my favorite chocolate desserts, I decided to make a Nutella Pots de Creme! It is so easy to make and it tastes wonderful with the addition of nutella! 


Nutella Pots de Creme

Ingredients:
-1 1/2 cups heavy cream
-1/4 cup sugar
-1/2 cup nutella
-2 egg yolks
-1/2 teaspoon vanilla extract
-Nutella whipped cream for topping (see below)
-Hazelnuts for topping

Directions:
Preheat the oven to 350 degrees F.

In a small saucepan, heat the heavy cream and sugar until the mixture is warm and the sugar is dissolved.

Meanwhile, in a bowl, lightly whisk the egg yolks.  Set aside.  In another bowl, scoop out the nutella and vanilla extract.  Set aside.

Take the cream mixture and pour it over the nutella.  Whisk until the nutella mixes in with the cream and sugar mixture.  Then, take the nutella and cream mixture, and, whisking continuously, slowly pour it into the bowl with the egg yolks.

Once all of the ingredients are well-mixed, pour the mixture into four ramekins. Place the ramekins in a deep baking pan and fill the pan with hot water, halfway up the side of the ramekins.  Bake in the oven for 30-35 minutes, or until the mixture sets and the center still slightly jiggles.  Allow to cool and then cover and refrigerate for at least 2 hours.

Nutella Whipped Cream:
While the pots de creme is chilling, make the nutella whipped cream.  Pour 1 1/2 cups heavy cream and 1/2 cup nutella in a bowl or kitchen aid mixer and whip until stiff peaks form.  Chill.


Serve chilled with some nutella whipped cream and enjoy the nutella goodness!

Pin It

Sunday, February 3, 2013

Super Bowl Sunday Lineup

It is Super Bowl Sunday and whether or not your team is playing, you will still most likely be watching the commercials and pigging out on an array of snacks! I myself am not really a football fan, but I love the Super Bowl because it is an excuse to whip up a bunch of different dips and snack items.  In addition to having Guacamole, Salsa, and Buffalo Wings (all must have items), I also like to add some other delicious food items to my Super Bowl Sunday menu.  Below are some of those items...

1.) Chili

2.) Heath Bar Toffee Dip with Apples

3.) Cream Cheese Vegetable Bites

4.) Pizza

And of course, the 5th most important item(s)... BEER and BOOZE! Happy Super Bowl Sunday! :)


Pin It