daily meal

Sunday, October 30, 2011

Foodbuzz 24x24: A Journey Back to Colonial New England

First off, let me start by saying how excited I am to be participating in this month's Foodbuzz 24x24! It was my first time participating in this event so I hope you all enjoy this post as much as I enjoyed making these historical goods!


As many of you know, I am a history buff.  I am also a travel buff.  So what does one do with these two loves? Well, ever since I graduated undergrad and began my graduate work, I have been trying to figure that out myself! Thankfully, I think I have finally found what I want to do with my life - work in a study abroad office! I have been working as a study abroad advisor for a few months now and I love every minute of it! One of the perks of my job is that I am also able to interact with the international students who attend our school.  As a result, I have met so many wonderful and interesting students!

So what does my love of studying abroad and working with international students have to do with this post??? Well, all of our international students bring so much culture and knew knowledge about the world to our office.  However, the students are constantly saying how they want to learn more about American culture and understand our way of life.  So, I decided that I wanted them to experience the authentic tastes of New England.  And this is where my love of history came into play...

Now begins your journey back to Colonial New England!


 Johnnycakes (aka Journey Cakes) 

Johnnycakes (or Journey Cakes because they were often taken as food to eat on long journeys) were a type of cornmeal flatbread that was an American staple.  The johnnycake is great served with maple syrup and butter, so I made maple butter! Just combine 1 stick of butter with 1/4 cup maple syrup.  Mix well and then refrigerate until the butter sets.  I promise you, it is delicious! 


Boston Brown Bread

Boston Brown bread is a dark, and slightly sweet bread made with wheat and rye flowers and molasses. This is pretty quick bread to make since there is no rising involved like other breads.  Once the batter is combined, you pour into a greased coffee can or cylinder shape pan, cover it, and steam it in the oven for 2 hours.  This bread also goes great with the maple butter!


Boston Baked Beans
Boston is not called Beantown for nothing! 

This was actually my first time baking beans as opposed to cooking them in a crock-pot, and they came out just as delicious! The pilgrims initially learned to prepare these beans from the Native Americans, and they added molasses to sweeten them and bacon or pork to add a little salt flavor. 


Indian Pudding 

When the colonists first arrived, they tried to recreate many of their homeland dishes.  However, the colonists did not yet have many of the same ingredients that they were used to having, but they did have an abundance of cornmeal thanks to the Indians.  As a result, the traditional Hasty Pudding from England (made with wheat flour) turned into Indian Pudding made with the Indian cornmeal. This pudding was traditionally served warm as a dessert but can also be served cold in the morning for breakfast. 

And now, I have saved the best for last.... 


 Joe Froggers & Hot Buttered Rum

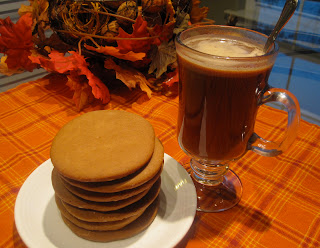
Joe Froggers have become my new favorite cookie! I had never actually had them until this past summer when I was in Marblehead, MA, at the Landing restaurant because that is where the cookie originated.  The cookies were created and baked by the one black couple living in Marblehead, MA.  The couple, known as Old Black Joe and Aunt Crese, lived in a tavern on Gingerbread Hill.  The cookies were named after Old Black Joe and the Frogger comes from the fact that they lived near a pond with several frogs always croaking.  Since these cookies can last for weeks without going stale, fisherman would take barrels of these cookies on their journeys.  

As I am sure you have noticed, many of these recipes require either molasses and/or cornmeal.  Many of the dishes served in colonial times were made from these ingredients since they were in abundance.  It is also the reason why rum was so popular! That is why I suggest serving these foods, especially the Joe Froggers, with a glass of Hot Buttered Rum! 

Hot Buttered Rum recipe (makes 2):
-2 to 4 tablespoons brown sugar 
-2 teaspoons butter
-Pinch of salt
-Pinch of nutmeg, cinnamon, and cloves
-4 oz. dark rum (2 oz. per glass)
-Boiling water

In a bowl, combine the brown sugar, butter, salt, and spices.  Refrigerate until firm.  Once ready, divide the mixture in half and place in the bottom of each glass.  Pour in 2 oz of rum per glass and top off with boiling water. 

For the recipe and more information on Joe Froggers, click here. 
For colonial recipes like the ones above and more, click here.

I hope you all enjoyed this colonial adventure as much the students and I did! 

Pin It

Thursday, October 27, 2011

Daring Bakers: Povitica

The Daring Baker's October 2011 challenge was Povitica, hosted by Jenni of The Gingered Whisk. Povitica is a traditional Eastern European Dessert Bread that is as lovely to look at as it is to eat!


I have to admit, I was somewhat nervous going into this challenge because it was my first ever Daring Baker's challenge!! When I first saw the recipe I thought to myself, "great, the month I decide to join is when they have something I have never even heard of!" However, when I saw the photos and the recipe it sounded so delicious looked so interesting, I knew I had to give it a go! And let me tell you, I am so glad that I did - so thank you Jenni for choosing this recipe!


There are a lot of steps to this recipe, but it really is not that difficult to make and it is well worth the effort! There are a few different fillings that are common for the Povitica - apple/cinnamon, apricot preserves, and a sweet cheese - but I wanted to try the traditional English Walnut filling first since I had never had Povitica before.  And let me tell you, it was heaven! I definitely suggest trying this original recipe first before getting creative with other flavors and fillings.

Povitica

Ingredients (Makes one loaf. See below for original recipe that makes 4 loaves)

To activate the yeast:
-1/2 teaspoon sugar
-1/4 teaspoon all-purpose flour
-2 tablespoons warm water
-1 1/2 teaspoons dry yeast

Dough:
-1/2 cup whole milk
-3 tablespoons sugar
-3/4 teaspoon salt
-1 large egg, beaten
-1 tablespoon unsalted butter, melted
-2 cups all-purpose flour, measured and then sifted

Filling:
-1 3/4 cup ground English Walnuts
-1/4 cup whole milk
-1/4 cup unsalted butter
-1 large egg yolk, beaten
-1/4 teaspoon vanilla extract
-1/2 cup sugar
-1/4 teaspoon unsweetened cocoa powder
-1/4 teaspoon cinnamon

Topping:
-2 tablespoons cold, strong, coffee
-1 1/2 teaspoons sugar
-Unsalted butter, melted

Directions:
First, activate the yeast.  In a small bowl, stir the sugar, flour, yeast and warm water.  Cover with plastic wrap and let sit for 5 minutes. 

For the dough, in a medium saucepan scald the milk making sure to stir constantly.  In a large bowl, mix the scalded milk, sugar, and salt until combined. Whisk in the beaten eggs, yeast mixture, melted butter, and flour (add the flour a little at a time because you may need more or you may need less). 

Turn the dough out onto a floured surface and knead, adding flour as needed, until the dough is smooth and no longer sticks. 

Place the dough into a lightly greased bowl.  Cover the bowl loosely with plastic wrap and then place a kitchen towel on top.  Set aside in a warm place and let the dough rise for about 1 hour and 30 minutes, or until it has doubled in size.

Meanwhile, prepare the filling.  Heat the milk and butter until boiling.  While the milk and butter heats up, in a large bowl, mix together the walnuts, sugar, cinnamon, and cocoa.  Once the milk and butter mixture has come to a boil, pour it over the nut and sugar mixture.  Stirring constantly, add in the eggs and vanilla. Allow to stand at room temperature until ready to use.  If it thickens up too much when you go to use it, you can add a small amount of warm milk to loosen it up again (I let the mixture stand for almost an hour though and it was fine).

Once the dough is ready, make sure to have a clean surface or sheet or cloth to work on.  Since I did not have a sheet or cloth to use I just wiped down my counter thoroughly and sprinkled it with flour.  Place the dough on the floured surface and roll out with a rolling pin, adding flour as needed.  Roll the dough out until it is very thin and measures 10-12 inches in diameter.  Try to make it more rectangular shaped.  Lightly brush a little melted butter on top of the dough and continue rolling the dough out until it starts to become somewhat transparent. As you work, make sure to continually pick up your dough around the edges to help it stretch out and to make sure that it is not sticking to the counter.

Spoon the walnut filling evenly over the dough until covered.  Very carefully, lift the edge of the dough (if using a cloth you can lift the cloth to help you lift up your dough) and gently roll it like you would a jellyroll.

Once the dough is rolled up into a rope, gently lift it and place it into a greased loaf pan in the shape of a "U," with the ends meeting in the middle. You want to coil the dough around itself so as to give it its characteristic shape when sliced.


(These pictures are courtesy of Jenni, because my dough was actually not long enough so I did not like how the photos came out.  These ones give a much better picture of how to place the dough into the pan)

For the topping, mix together the coffee and sugar (if you do not want this then you can just use an egg wash).  Brush the top of the loaf with the coffee and sugar mixture, cover with plastic wrap, and let stand for 15 minutes.  Meanwhile, preheat your oven to 350 degrees F.

When ready, remove the plastic wrap and place the loaf pan in the oven.  Cook for 15 minutes.  After 15 minutes, lightly brush the top of the loaf with a little more butter (you do not have to if you prefer not to), and lower the oven temperature to 300 degrees F. Cook for 45 minutes at this temperature, but make sure to check it after 30 minutes.  If the top of the loaf begins to brown too soon you can cover it with tin foil.

Once ready, remove the loaf from the oven and allow to cool on a wire rack for 20-30 minutes.  Make sure to leave the loaf in the pan during this time so that the loaf can hold its shape.  You can remove the loaf from the pan once it has completely cooled to room temperature.  It is recommended that you turn the loaf upside down and slice it with a serrated knife, but I did not have any issues when slicing it right side up.


Since this was my first time ever having this I was unsure of what to expect, but HOLY CRAP! I am definitely going to be making this again soon for the upcoming holiday season.  It reminded me of a breakfast pastry but also of an after dinner treat.  It really can be enjoyed during any time of the day, but I loved sitting back and devouring a slice with my cup of coffee!

Enjoy!

Storage: 
There are several options for storing (and eating) your four loaves of Povitica:


• The Povitica will keep fresh for 1 week at room temperature.


• The Povitica will keep fresh for 2 weeks if refrigerated.


• The Povitica can be frozen for up to three months when wrapped a layer of wax paper followed by a layer of aluminum foil. It is recommended to not freeze Povitica with cream cheese fillings as it doesn’t hold up to being thawed really well – it crumbles.


Ingredients for 4 loaves:
To activate the Yeast:
2 Teaspoons (10 ml/9 gm) Sugar
1 Teaspoon (5 ml/3 gm) All-Purpose (Plain) Flour
½ Cup (120ml) Warm Water
2 Tablespoons (30ml/14 gm/½ oz/2 sachets) Dry Yeast
Dough:
2 Cups (480ml) Whole Milk
¾ Cup (180 ml/170gm/6 oz) Sugar
3 Teaspoons (15 ml/18 gm/2/3 oz) Table Salt
4 Large Eggs
½ Cup (120ml/115 gm/one stick/4 oz) Unsalted Butter, melted
8 cups (1.92 l/1.12 kg/39½ oz/2½ lb) All-Purpose Flour, measure first then sift, divided
Walnut Filling:
7 Cups (1.68 l/1.12 kg/2.5 lbs) Ground English Walnuts
1 Cup (240ml) Whole Milk
1 Cup (240ml/225 gm/2 sticks/8 oz) Unsalted Butter
2 Whole Eggs, Beaten
1 Teaspoon (5ml) Pure Vanilla Extract
2 Cups (480ml/450 gm/16 oz) Sugar
1 Teaspoon (5 ml/4 gm) Unsweetened Cocoa Powder
1 Teaspoon (5 ml/3 gm) Cinnamon
Topping:
½ Cup (120 ml) Cold STRONG Coffee
2 Tablespoons (30 ml/28 gm/1 oz) Granulated Sugar
Melted Butter


Pin It

Monday, October 24, 2011

Pumpkin Waffles

I have been dying to make these babies all season long! Breakfast is my favorite meal and I always like to go all out on the weekends when I actually have time to make a decent meal! I have been pouring over pumpkin waffle recipes for some time now and I think I have finally found the perfect one.  This recipe comes from the Pumpkin Waffles Blog and it truly is the perfect seasonal breakfast.


  Pumpkin Waffles

Ingredients:
-1/4 cup light brown sugar
-3 tablespoons corn starch
-1 1/4 cups all-purpose flour
-1 1/2 teaspoons baking powder
-1/2 teaspoon salt
-1 3/4 teaspoon cinnamon
-2 teaspoon ginger
-1/4 teaspoon cloves
-1/2 teaspoon nutmeg
-2 large eggs, separated
-1 cup whole milk
-1 cup canned pumpkin
-4 tablespoons unsalted butter, melted
*Please Note: I have made this recipe twice. The first time I made it word for word from this recipe and the second time, instead of using all of the spices, I just put in 2 1/2 teaspoons pumpkin pie spice and 1/4 teaspoon cloves.  Both recipes came out scrumptious! It just depends if you like more or less spice. 


Directions:
Turn on and heat up your waffle maker to desired setting.

In a bowl, whisk together the brown sugar and cornstarch.  Then, whisk in the flour, baking powder, salt, and spices.  Set aside.

In a separate bowl, whisk together the egg yolks (save the egg whites), milk, and pumpkin.  Slowly pour in the butter and whisk continuously as you do so.  Set aside.

In a smaller bowl, beat your egg whites until stiff peaks form.

Add the pumpkin mixture to the dry ingredients and mix until just combined.  Gently fold in the egg whites until they are completely mixed in. Using a large serving spoon, scoop the batter onto the waffle iron (every waffle maker is different, but for mine I use about 1 - 1 1/2 cups worth of batter per waffle).  Cook per the manufacturer's instructions.  Most waffles take about 2 minutes and 30 seconds, but mine is a cheaper one and take a little longer.  You may have to play around with it a bit until you get the cooking time and temperature that work best.


Allow the waffles to cool for a couple of minutes on a wire rack and serve immediately or freeze for later use.  I like to serve my pumpkin waffles with butter, walnuts, and syrup! Enjoy!


For more delicious pumpkin recipes, check out these following posts on FN Dish as part of Food Network's fall fest!


What's Gaby Cooking: Pumpkin Chocolate Chip Bars
The Cultural Dish: Pumpkin Waffles
Cooking With Elise: Pumpkin Chip Scones
And Love It Too: Creamy Pumpkin Fruit Dip
CIA Dropout: Pumpkin Panna Cotta With Gingerbread
Haute Apple Pie Girls: Pumpkin Bread Parfait
I Am Mommy: Pumpkin Pancakes
Dishin and Dishes: Maple Pumpkin Creme Brulee
Virtually Homemade: Pumpkin Cream Cheese Muffins With Pumpkin Seed Streusel
Napa Farmhouse 1885: Pumpkin Pizza
Daydreamer Desserts: Pumpkin Fattigman
From My Corner of Saratoga: Baking Pie In The Pumpkin
FN Dish: The Ultimate Pumpkin Soup
Cooking Channel: Pumpkin Risotto
The Sensitive Epicure: Pumpkin Whoopie Pies With Molasses Marshmallows
Daily*Dishin: Pumpkin Praline Cheesecake
ZaikaZabardast: Pumpkin Jalebi
Mooshu Jenne: Pumpkin Nutella Bread
Big Girls Small Kitchen: Chocolate Chip Pumpkin Loaf


Pin It

Monday, October 17, 2011

Pumpkin Pie Fudge

Believe it or not, as in love with pumpkin as I am, I do not like pumpkin pie.  I still make it every year because I know my family loves it, but I could just never get into it! I love pumpkin bread, pumpkin pasties, pumpkin soup, pumpkin cheesecake, pumpkin waffles, and everything else pumpkin... but not pumpkin pie!  Weird huh? One thing I do love though (and this definitely makes no sense), is Pumpkin Pie Fudge!


As odd as it may be that I do not like the single most traditional, pumpkin treat of the season, I promise that for pie lovers and for non-pie lovers, this fudge is fantastic! It has the perfect pumpkin flavor with a hint of fall spices and it melts in your mouth the minute you consume it.  It is also really easy to make!

Pumpkin Pie Fudge (Adapted from several sources)
Ingredients:
-2 cups granulated sugar
-1 cup light brown sugar (I've used dark too)
-3/4 cup butter
-2/3 cup evaporated milk
-1/2 cup canned pumpkin
-1 to 1 1/2 teaspoons pumpkin pie spice (for less spice kick just use one teaspoon)
-1 package white chocolate chips
-1 jar (7 oz) marshmallow crème
-1 cup chopped walnuts or pecans (optional)
-1 1/2 teaspoons vanilla extract

Directions:
Butter a 9x13 baking pan (I have used an 8x8 as well to get larger pieces) and set aside.

In a saucepan, combine the sugars, butter, condensed milk, pumpkin, and pumpkin pie spice.  Heat until all the ingredients are combined and begin to boil.  Stirring constantly, allow the mixture to boil for about 10 minutes or until is reaches 234 degrees on a candy thermometer.

Remove from heat and quickly stir in the white chocolate chips, marshmallow crème, nuts (if using), and vanilla until all ingredients are fully combined and the chips are melted.  Immediately pour the fudge into your prepared baking dish and let sit on a wire rack for at least 2 hours to cool and store in your refrigerator.


Cut the fudge into squares and enjoy the pieces as they melt in your mouth! Enjoy!

Pin It

Tuesday, October 11, 2011

Butternut Squash Soup - Revisited

It's that time of year where I actually start to like soup again! Despite the abnormally warm weather New England has been having this week, I have still been in the mood for fall soups.  Last year, I made a butternut squash soup and served it in pumpkin bowls.  The soup was such a hit that I decided I needed to make it again this year.


I changed up the recipe a little bit this time around because I like to update things every now and then.  To view the recipe, click here.  Please try not to be too judgmental about the photos in the post.  It has been a year now and I like to think I have improved a bit! Although believe it or not, I am still using the same point and shoot camera.  I have made a promise though that I will buy a better camera for myself this Christmas! 


 (You can even serve this soup in Pumpkin Bowls)

Hope you enjoy! 

Pin It

Wednesday, October 5, 2011

Pumpkin Pasties

As promised, I am bringing you all another tasty pumpkin recipe for fall.  It just so happens that this fall recipe is also an adaptation of an English treat that is mentioned in the Harry Potter books (no, I am still not over Harry being gone).


The idea of making Pumpkin Pasties originated from the famous Cornish Pasty.  The Cornish Pasty is traditionally filled with beef, potatoes, turnip, onions, and salt and pepper.  The ingredients are encased in rolled out dough and baked until golden brown.  Making these delightful pasties is on my to-do list, but first, I shall enjoy the pumpkin version!


Pumpkin Pasties
Ingredients:
-1 cup canned pumpkin
-1/4 cup granulated sugar
-1/4 teaspoon cinnamon
-1/4 teaspoon nutmeg
-1 prepared pie crust
-1 egg beaten with 1 tablespoon water for egg wash
-Sugar for sprinkling

Directions:
Preheat the oven to 375 degrees F. 

In a bowl, mix together the pumpkin, sugar, cinnamon, and nutmeg until well combined.  Roll out the prepared dough on a cookie sheet and cut into circles using a 4 or 5-inch round cutter.  In the middle of each circle place a scoop of the pumpkin mixture (about 1 to 1 tablespoons).


Fold the dough over the filling to seal and use the end of a fork to crimp and seal the edges.  Cut little tiny slits on the tops to make vents.  Brush each pasty with the egg wash and sprinkle a little sugar on top if you would like.


Bake in the oven for 30 minutes or until browned.  These pasties can be eaten for breakfast, as a snack, or as an after dinner treat!

Enjoy!


Pin It