daily meal

Monday, January 31, 2011

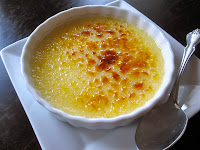
Crème Brûlée

Although I am a self-proclaimed chocoholic and have attended many chocolate buffets, parties, and tastings, crème brûlée is my all time favorite non-chocolate dessert! There is just something about the crunchy, sugary topping, and the rich and creamy, vanilla custard filling that I cannot get enough of! Even when I was in Paris, I had to order two things every day: crème brûlée and a chocolate filled crêpe (I still had to get my chocolate fix somehow). 

Granted, even though crème brûlée may not be the healthiest of desserts, it does not make you feel as full and overstuffed like many other after dinner treats can. Although I love the lightness of crème brûlée, some may view it as a danger, as you can often eat more than one!  What makes this dessert even better though, is that it is surprisingly easy to make.  I had always assumed that making crème brûlée would be an extremely difficult, tiresome, process, but thankfully it is the complete opposite! 
Crème Brûlée
Ingredients:
-1 extra large egg
-4 extra large egg yolks
-1/2 cup of sugar plus more for sprinkling
-3 cups heavy cream
-1 to 1 1/2 teaspoons vanilla

Directions:
Preheat the oven to 300 degrees F. 

In a bowl, blend the egg, egg yolks, and 1/2 cup of sugar until just combined. Meanwhile, scaled the cream until it is just hot enough, but do not boil.  When the cream is ready, pour it slowly into the egg mixture while blending it together on low-medium speed.  Add the vanilla.  I usually use all of the vanilla because I like the taste, but if you prefer a lighter vanilla taste, then just use 1 teaspoon.  

Once the mixture is ready, pour into individual ramekins.  Place the ramekins in a larger baking pan and fill the pan with hot (preferably boiling hot) water until it comes about halfway up the ramekins.  Bake for 35 - 40 minutes, until the custard is set.  Carefully remove the ramekins from the water bath and allow to cool to room temperature.  Once cooled, chill in the fridge for at least one hour, but they will taste even better if you let them sit overnight. 

When ready to serve, sprinkle about a tablespoon of sugar evenly over each individual ramekin.  Using a kitchen blowtorch, heat the sugar until it caramelizes.  If you do not have a torch, a broiler can work as well.  Allow to sit for one minute so that the caramelized sugar will harden.  Serve plain, or with a dollop of whipped cream.  Enjoy! 


Pin It

Saturday, January 29, 2011

Avocado Milkshake (Sinh to Bo)

Although the thought of an avocado shake (or Sinh to Bo) may sound a little odd to some, it is actually an extremely tasty drink and a very popular, traditional, Vietnamese specialty.  Avocados are often used as a dessert or sweet treat in Vietnamese as well as other Southeast Asian dishes.


The very first time I had an avocado milkshake, I was sitting at Lei's (Pho restaurant) in Allston, MA.  I would usually order Thai Bubble Tea (which is also quite amazing), but decided to give the avocado shake a try.  As much as I love avocados, I was still pretty nervous as to how it would taste in shake form.  Turns out, it was love at first sip!
Avocado Milkshake
Ingredients:
-1 ripe, medium sized avocado
-About 12-15 ice cubes
-1/2 cup sweetened condensed milk
-1/4 to 1/2 cup milk

Directions:
Scoop out all of the avocado flesh and place in a blender.  Add all of the remaining ingredients and blend until combined.  Depending on the consistency you prefer, you may want to add more milk or ice.  I like my shakes a little thicker so I always use 1/4 cup of milk.  When making this for others who like it a little looser, then I will use a 1/2 cup of milk. 

This shake is great when served right away, but I found that waiting just even 15 minutes or so will help to bring out the flavors even more! However, I usually cannot wait.... Enjoy!
Pin It

Tuesday, January 25, 2011

Italian Breadsticks

How many times have you been out to eat at an Italian restaurant and had a delicious breadstick?  They are so sinfully tasty, but despite how good they may be, most people never even try to make them at home.  Although they may seem difficult, they are actually quite easy and do not require a ton of ingredients.  In fact, most people usually have all the ingredients lying around in their kitchen.  The only hassle with making breadsticks is waiting - for the dough to rise that is.  Patience is key when making these appetizing treats.  The recipe below was adapted from the food network website, and for those who have ever been to an Olive Garden, I promise that these breadsticks will taste just like theirs, if not better!
Italian Breadsticks
Ingredients:
-1 package of active dry yeast
-1/4 cup warm water
-4 1/4 cup flour, plus extra for rolling
-2 tablespoons unsalted butter, softened
-2 tablespoons sugar
-1 tablespoon salt
-1 1/4 cup warm water, plus 2 tablespoons (if needed)

Topping:
-3 tablespoons butter
-1/2 teaspoon salt, plus extra for sprinkling
-1/4 teaspoon garlic powder
-Pinch of oregano 

Directions:
To make the dough, place the package of yeast in a bowl with 1/4 cup warm water.  Let sit for a few minutes.  Sift in the flour, sugar, and salt.  Mix in the butter.  The dough will still be very dry, so add in the 1 1/4 cup of warm water.  Using your hands, mix the dough together.  If the dough is still a little too dry, then add 1 - 2 tablespoons of warm water.  If you end up adding too much water and the dough becomes too wet, you can just sprinkle in more flour a little at a time.  

The dough will be very sticky, so flour your hands and the surface area you will be working on very well.  Knead the dough until smooth (about 5 minutes).  Roll the dough out into a 2-foot long log.  You will need to roll and pull out the dough in order for it to stretch out.  Once rolled out, cut the log into 1 1/2 in long pieces.  If you measure it, you will get exactly 16 pieces.  But do not worry, I usually just eye it and still get 14-16 pieces.  
Once you have all of your pieces, briefly knead each one again, and roll out into about a 7-inch long log.  Lay on a baking sheet 2 inches apart.  When all of the pieces have been rolled out and are on the pan, place a cloth over the entire pan and let rest in a warm place until doubled (about 45 minutes). 

Meanwhile, preheat the oven to 400 degrees F.  When the dough is ready, melt 1 1/2 tablespoons of the butter and lightly brush it over the dough.  Sprinkle each stick with a little salt and then place in the oven for 15 minutes.  
As soon as the breadsticks come out of the oven, melt the rest of the butter (1 1/2 tablespoons) and mix the oregano, garlic powder, and salt into the melted butter.  Brush the breadsticks with the topping.  Depending on your taste buds, I usually sprinkle a little more oregano on top of each breadstick.  Not only does it add even more flavor, but adds color as well.  

Serve warm alongside any Italian meal or eat just as a snack! Enjoy! 


Pin It

Sunday, January 16, 2011

Cannoli

The cannoli is one of the most popular and traditional of the Italian desserts.  They are also my absolute favorite treat! I love being able to sink my teeth into a fresh, creamy, ricotta filled cannoli with a firm shell coated in confectioner's sugar.  Not only are cannoli a perfect dessert with just enough sweetness, but they are great for a dinner party since they help to enhance the dinner table and make it look that much more appealing.  They are so elegant and professional looking that your guests will think you had them delivered!
Cannoli
Ingredients:
-12 cannoli shells (can be bought at the market or any bakery)
-2 pounds ricotta cheese
-2 cups confectioner's sugar, plus extra for sprinkling
-3-4 teaspoons vanilla (to taste)
-Zest of about 1 lemon
-1/2 teaspoon cinnamon (optional)
-1/4 cup chocolate chips (optional)
-Chopped pistachios or walnuts (optional)

Directions:

Prep the ricotta.  The Ricotta filling will come out best if you allow it to drain overnight.  You can make it the same day, but the filling will be slightly more runny and gritty.  Therefore, I find it best to put the ricotta in a strainer and place the strainer over a bowl so the water has a place to fall.  Cover with plastic wrap and leave in fridge over night.  

The next day, transfer the ricotta to a sieve.  Push the ricotta through the sieve and into a bowl to help reduce any of the grittiness that may be left.  

Once that is done, mix in the confectioners' sugar, vanilla, zest, cinnamon (if using), and chocolate chips (if using).  Reserve the nuts for later if using.  Chill the mixture for a few hours or even overnight so that the flavors can really have a chance to meld together.  

When ready, transfer the cannoli cream mixture to a piping bag and pipe the filling into the shells.  Dip the ends of the shells into the nuts if using.  I usually prefer to have my cannoli plain, without any extra chocolate chips or nuts, but sometimes it is nice to make a few of each.  If you rotate between having some plain, some with chocolate chips, and some with nuts, it can look very festive and the colors are beautiful!

Once the shells are filled, dust them lightly with confectioner's sugar and enjoy!


If you are ever in the mood for a cannoli but do not have the time to make them, I suggest taking a trip to Boston and visiting a little shop called Maria's.  Maria's has the absolute best cannoli!  When I was still in school, I would often walk to the North End in between classes just to eat a cannoli and enjoy it with a cappuccino.  

The owner, Maria, is a cute, little, old Italian woman who is so sweet and makes everything in her shop fresh, daily!  She also has the cutest little cat, Cookie, who is often roaming around the shop trying to sneak a bite.  Don't worry though, if you are not a fan of cats she is harmless, but her adorable face is hard to resist! 
(She was camera shy!)

Pin It

Wednesday, January 12, 2011

Mojito

I figured that it was about time to post a cocktail recipe on here, so I decided to start with my favorite drink: the Mojito! The Mojito is a traditional Cuban highball mix drink comprised of mint leaves, sugar, lime juice, rum, tonic water and/or sparkling water.


There are several variations of the Mojito, and adding different fruit flavors is very popular.  This recipe is the basic Mojito, but you can always add different fruit flavored vodkas or rums such as, strawberry, raspberry, mango, and lychee for a different twist!

Mojito Recipe
Ingredients:
-12 mint leaves
-2-4 tablespoons sugar (to taste)
-4-6 tablespoons lime juice
-1 shot of light rum
-Ice
-Tonic water or sparkling water

Directions:
In a tall glass, add mint leaves, sugar, and lime juice.  Muddle the ingredients to help release the oils/flavor of the mint.  Fill glass with ice.  Then, add the rum and top off with tonic water until glass is full.  Mix very well so that all ingredients, especially the sugar, dissolve and blend together.  

Garnish with some slices of lime and a few mint leaves.  Relax and enjoy!

~
If you are in the mood for a Mojito but do not have all of the ingredients, there are plenty of restaurants that serve a great Mojito! Here are just a few:

Petit Robert Bistro - Boston, MA
Daedalus - Cambridge, MA
The Cheesecake Factory - Burlington and Cambridge, MA
Pin It

Tuesday, January 4, 2011

Recent Cakes

I just wanted to share photos of some of the more recent cakes and pastries that I have created.  I had a blast making them so I hop you enjoy viewing them! 
4th of July Sparkler Cake.  This cake and the beer cooler cake can be used for any summer cookout! Just roll out the fondant in the design you want and insert a sparkler for flare! :)

 Beer cooler birthday cake

 Crazy shirt and tie cake for a themed birthday party

Angel cake and cake balls for a confirmation

 The Hayes Apartment Building's grand opening cake


Pink and white chess board cake for a girl's 10th Birthday

 Beatles themed record player/album cake

 Rose wedding cake


 Pastries and a Dancer's Wedding cake

 Fall Cupcake Tower for a Bridal Shower

 Groom's Cake


 Seashell Birthday Cake


Birthday cake for both a police officer and shopaholic who loves leopard print! This was definitely a different, but very fun, cake to create. 

Hope you enjoyed!
(For more information on my cakes visit SlipperCityCakes.com or email me at Slippercitycakes@gmail.com.  I am also on facebook: www.facebook.com/SlipperCityCakes)
Pin It

Sunday, January 2, 2011

Eggs Benedict with Mimosa's

Eggs benedict is one of my most favorite comfort foods to eat for breakfast... or sometimes even for lunch or dinner! There are many different "twists" and variations to making eggs benedict, and as much as love using salmon or spinach, I always end up resorting back to the original recipe.   The recipe below for eggs benedict is simple, easy, and provides for a very filling breakfast!
Eggs Benedict
Ingredients:
-4 eggs
-4 English muffin halves
-4 slices of ham
-White vinegar


Hollandaise Sauce:
-4 egg yolks
-1 tablespoon lemon juice
-1/2 cup butter melted (1 stick)
-Salt, pepper, and cayenne pepper to taste


Directions:
Fill a pot with water and let it come to a boil.


While waiting for water to boil, prepare your hollandaise sauce.  In a blender, mix the egg yolks, lemon juice, salt, pepper, and cayenne pepper until the mixture thickens a little.  Leaving the blender on, slowly pour in the melted butter a little at a time.  Continue blending until the mixture thickens and set aside.


Meanwhile, toast the 4 English muffin halves, and in an oiled skillet, heat up and brown the 4 ham slices.  Once the ham slices are cooked to your liking, place one slice each on top of the English muffin halves.


By now the water in your pot should be boiling.  Turn to low heat and add a little vinegar (this helps to keep the eggs together).  Crack 4 eggs into a cup and then slowly, and carefully add the eggs to the water and vinegar.  I recommend doing this because if you just crack open the eggs straight into the pot of water, they will plop in and you could burn yourself, which is why I crack them in a separate cup first.


Cook eggs for at least a few minutes (or more depending on how cooked you prefer them).  You may need to use a spoon to keep the egg whites close to the yolk.  Once done, using a slotted spoon, remove the eggs and place each one on top of the ham and English muffin halves.  Finish by pouring the hollandaise sauce over the top of the eggs.  Depending on how long the sauce has been sitting, it may need another stir before pouring in order to loosen it up a bit.


Depending on your mood, if you have any leftover champagne from New Years that you need to use up, you can whip up a couple of mimosa's to go with your breakfast.
Mimosa Recipe
Ingredients:
-Champagne
-Orange Juice
-Grenadine


Directions:
Take a champagne glass and fill it just about halfway with orange juice.  Fill the rest of the glass with champagne.  To add a little color, pour in a few drops (or more) of grenadine to create that sunset look.  Drink up and enjoy!


~
If you are not in the mood to cook, there a few places nearby that serve wonderful eggs benedict dishes among many other breakfast items:


The Early Bird Cafe - Plaistow, NH: Although there is always a wait, they move extremely fast and provide amazingly delicious food.  Out of all the years that I have been going to the early bird cafe, I have never been disappointed.  The service is great, fast, and the food is reasonable priced.


The Village Square - Bradford, MA: A very small, quaint, place, the village square serves great eggs benedict with an extremely tasty hollandaise sauce.  Aside from sometimes being a little slower than the early bird, the overall experience is just as great.


Stonehenge Inn, Tyngsboro, MA: Be forewarned, I would normally never recommend this place.  It is extremely overpriced and the service is painfully slow.  There food was also nothing to write home about; however, they surprisingly have one great item on their menu - Eggs Benedict.  If you are willing to spend the time and money, this inn has one of the best eggs benedict dishes I have ever had.  The hollandaise sauce was superb.  I was extremely shocked because overall, I am not a fan of this place and do not plan on going back, but, if you do live nearby and are an eggs benedict fanatic, then I will recommend this place for that dish and only that dish.  The other two restaurants will always be a personal favorite though.


Happy eating!


Pin It